Revenue Cloud (CPQ and Billing) Implementation
Contents:
- Introduction to Opero Documents
- Initial Install Steps
- Setup Document Generation Buttons
- Customize Your Templates
- Customize Document Actions
- Use Groupings on Quote
- Managing Terms in Document
- Auto Emailing Invoices with Invoice Scheduler
- Emailing Invoices from List View in Batch
Introduction to Opero Documents
Opero Documents will allow you to create templates where you can then click a button or automatically generate a document such as a PDF and attach it, email it, or download it while merging your Salesforce data dynamically from the Quote or Invoice record.
You can also use Opero Documents for generating any other documents such as contracts as needed in Salesforce based on any standard or custom object
After you install the app there will be a custom object called Document Actions. This is where you will create a Document Action record for each document you want to be creating. For example, one document action to generate and email a Quote and another document action to generate and email an Invoice. On the Document Action record is where you configure what you want to have happen.
Do you want to attach the PDF to the record or a Word file type? Do you want to email the document? Do you want to direct to the email preview page or just automatically send it? What email template do you want to use? And many other settings to define what you want to happen.
The Document Action is also where you specify which google doc to use for your template. You can also edit the template and get merge field codes from your Salesforce data to paste into your template. The Document Action will then generate a button code for you that you can copy and then create the custom button on your object like a Quote to execute the document action. For example, a button called Email Quote that when you click it, it will generate the quote and redirect it to the email preview page.
Then you just add this button to your page layout and then you can view a record and click the button to execute the document action.
Another feature is to automate Document Actions by using Process Builder, Workflow, or Apex to execute a Document Action in the background. For example, if an Invoice Status becomes Posted a Process Builder can automatically execute a document action to generate the Invoice pdf and email it to the billing contact.
Initial Install Steps
- The first step to implement Opero Documents for CPQ/Billing is to install Opero Documents app from the Appexchange and then install the Opero Documents for CPQ/Billing package that includes configurations to help get started with using the app for CPQ/Billing.
- Install CPQ/Billing app into your Salesforce org if not already.
- Install Opero Documents app into your Salesforce org from AppExchange here: https://appexchange.salesforce.com/appxListingDetail?listingId=a0N3000000B5O5UEAV
- Install the Opero Documents for CPQ/Billing unmanaged package using this link: https://login.salesforce.com/packaging/installPackage.apexp?p0=04t5w000005qqeF
- The unmanaged package will install some default configurations using Opero Documents to allow you to generate a Quote pdf and Invoice pdf. These configurations are unmanaged and completely open for you to customize and change to fit your needs. These configurations allow you to have a quick jump starting place for use with CPQ/Billing.
- Once you install the unmanaged package, go to the app launcher and select “Opero Docs CPQ Config”.
- Click “Execute Script” button. Clicking this button will install some default Document Action records. You only need to click this once. You are free to delete this custom tab and matching Visual force page and apex classes if desired.
- Open the Opero Documents app, click on DocGen Configuration tab, and click Grant Access.
- This will prompt you to authorize your Google account access to use the app. Google Drive (Google Docs) is used to manage templates and generate new documents. You will use your own google account to manage your own templates and generate documents within your own google drive. If you do not have a google account already you can sign-up for free.
- Click “Allow” to authorize.
- When successful you’ll be forwarded back to the Salesforce DocGen Configuration tab. You may close this browser tab. Initial setup is completed, now proceed with adding buttons to the Quote and Invoice layouts.
Optionally you can generate Google Docs to use and send to customers if desired. This allows you to take advantage of Google Docs powerful sharing and collaboration tools with your internal team or with customers and prospects.
If you don’t plan to utilize the benefits of Google Docs as a collaboration tool among your team or with customers when negotiating contracts you may configure Opero Documents to Authorize a single Google account for the whole org. Otherwise, you would have each user go to the DocGen Configuration tab to authorize their own google account.
Setup Document Generation Buttons
The next step in this process is to configure buttons on Quote and Invoice that will be used to generate documents.
Add Email Quote button to the Quote page layout
- Go to Setup, Object Manager, select Quote object, then go to Page Layouts and edit your page layout.
- Drag buttons and lightning actions called “Email Quote” onto your page layout.
- You may also optionally drag the field “Quote Doc URL” onto your page layout which is a text field that will capture the Google Doc URL that is generated. You can use this field to then send a link to this to a customer in your email template optionally.
- Click “Save” to apply changes to the layout.
Update the “Email Quote” button URL
- This button was installed from the unmanaged package and you need to modify it to work correctly, because it is referencing specific Document Action and the Email template that has a unique ID in your org.
- Open Opero Documents App and click on Document Actions tab. In the list view select “All” and open “Email Quote” Document Action.

- After opening the Document Action scroll down to the very bottom to find the Button/Link formula section. Copy the long url to clipboard under Button/Link Code.
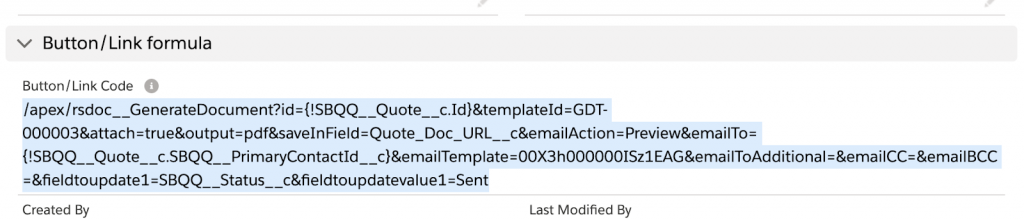
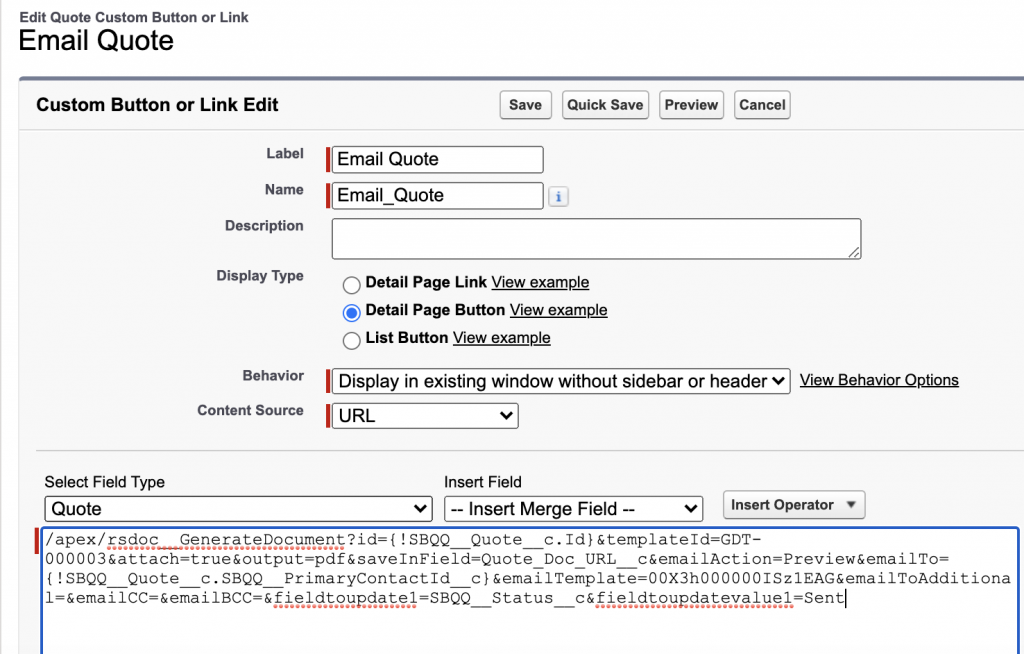
- Now you need to update the “Email Quote” button url that was previously added to the layout. Open Setup go to Object Manager, select Quote, click on Buttons, Links and Actions tab and in the list of items click on Email Quote.
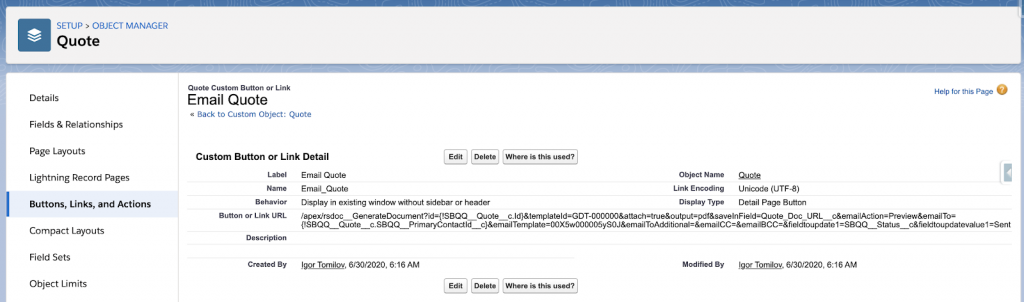
- Click “Edit”, delete the existing URL and paste the URL that was copied on the Document Action. Click “Save”.
Add the “Email Invoice” button to the Invoice page layout
This process is similar to adding an Email Quote button.
- Go to Setup, Object Manager, select Invoice object, then go to Page Layouts and edit your page layout.
- Drag buttons and lightning actions called “Email Invoice” onto your page layout. Drag the field “Send Status” onto the page layout. This field is used to track the status of sending your invoice and used to execute sending it automatically.
- You may also optionally drag the field “Invoice Doc URL” onto your page layout which is a text field that will capture the Google Doc URL that is generated. You can use this field to then send a link to this to a customer in your email template optionally.
- You may also add the field included called Doc Gen Error to the page layout. This field is used mainly if you are automating document generation so that if there is an error in the automation this field will be populated with the error message.
Update the “Email Invoice” button URL
This button was installed from the unmanaged package and you need to modify it to work correctly because it is referencing a specific Document Action and the Email template that has a unique ID in your org. This process is similar to updating the “Email Quote” button.
- Open Opero Documents App and click on Document Actions tab. In the list view select “All” and open “Email Invoice Preview”Document Action.
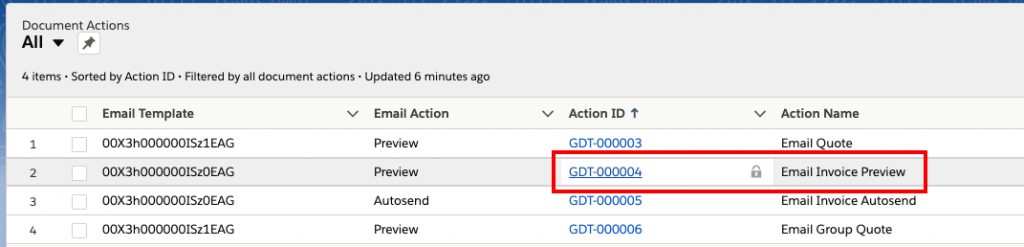
- After opening the Document Action, scroll down to the very bottom to find the Button/Link formula section. Copy the long url to clipboard under Button/Link Code.

- Now you need to update the “Email Invoice” button url that was previously added to the layout. Open Setup go to Object Manager, select Invoice, click on Buttons, Links and Actions tab and in the list of items click on Email Invoice.
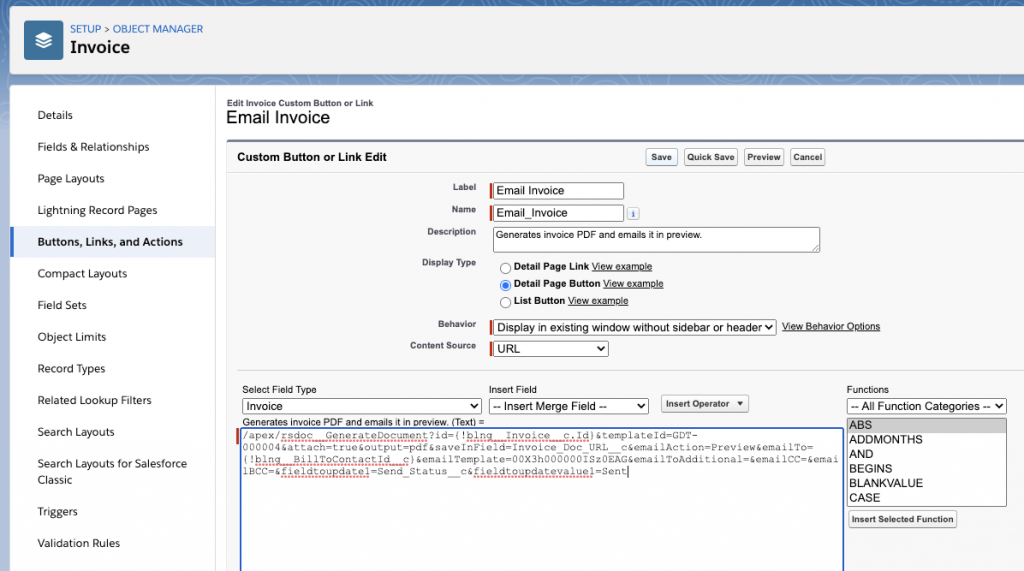
- Click “Edit”, delete the existing URL and paste the URL that was copied on the Document Action. Click “Save”.
- You have completed setting up document generation buttons! To see the app now in action after you authorized your google account and added the buttons to your Quote page layout go to a Quote you have built and click “Email Quote”.
- The button should generate the Quote document and then direct to the email preview page to view the email and attachment before you click send. The Email To would be auto populated with the Primary Contact on the Quote if the field has a value.
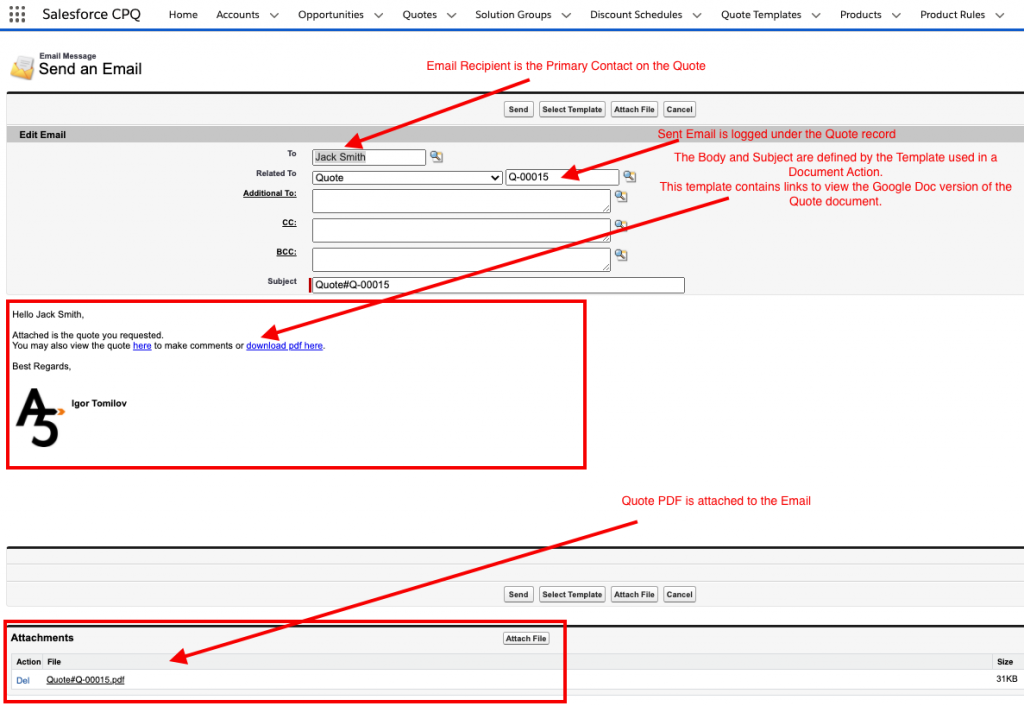
- After you click Send Email or Cancel you can see on the Quote record the Quote Doc URL field will be populated with the generated google doc of the quote, Status was updated to “Sent”, the quote PDF related under Attachments, and the activity history of the email sent.
- You can also test emailing an Invoice by going to an Invoice and clicking the “Email Invoice” button.
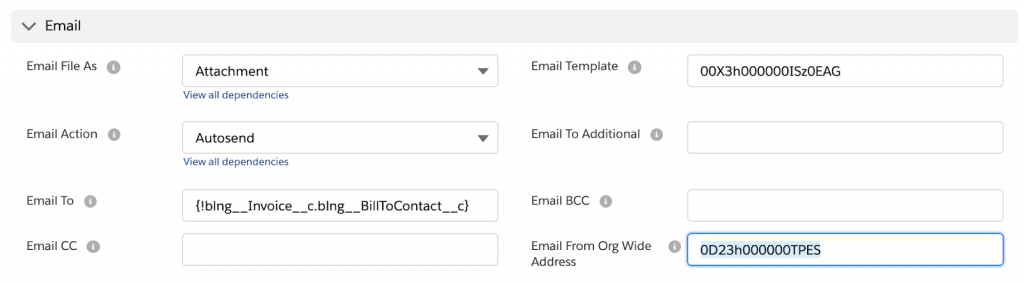
The document action is configured to email the Bill To Contact on the Invoice as a default.
Customize Your Templates
- To edit the template go to the Document Actions tab and view the All list view. Click on the Email Quote document action record.
- You can see the settings of the document action which we will go over next. First click the button on this page called Edit Template Document. You will see the included Quote template provided by the unmanaged package which is a google doc. You will not be able to edit this google doc since it is a default template for all users. To customize the included template you create a copy of it.
- Click the link to open the google doc in a new window.
- With the google doc open in its own tab, go to File, and select Make a Copy.
- Adjust the filename of the google doc to how you want the PDF file named when generated. In our default template we merge the Quote ID into the filename, however, you can merge any field into the file name such as the customer Account Name.
- Optionally you can create a folder on your google drive to save your templates into otherwise by default it will go into My Drive general area. For file sharing settings, see the Opero Documents Basic Configuration article.

- Click the Share blue button in top right and adjust the settings so that anyone with the link can view the google doc. This permission is necessary in order to use it as a template. Optionally you can provide edit access or comment access to other users in your organization to collaborate on editing this template. See Opero Documents Basic Configuration article for more detail.
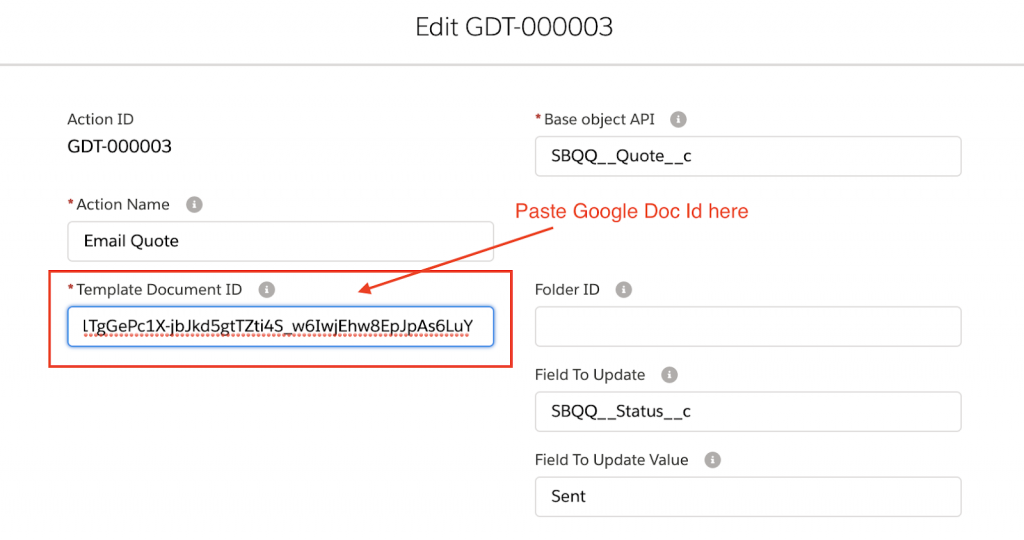
- Copy the google doc id from the url in the browser. This Id is between /d/ and /edit in your browser.

- Go back to Salesforce tab and click “Go Back” button to go back to the Document Action. Edit the Template Document ID field to paste the google doc id you copied from the newly created google doc.
- If you have an existing Quote template doc in Word you can upload to Google Docs and convert it to a google doc and update Document Action with that google doc id. Or if you want to start a new google doc from scratch you can create a new google doc and use that google doc for the template.
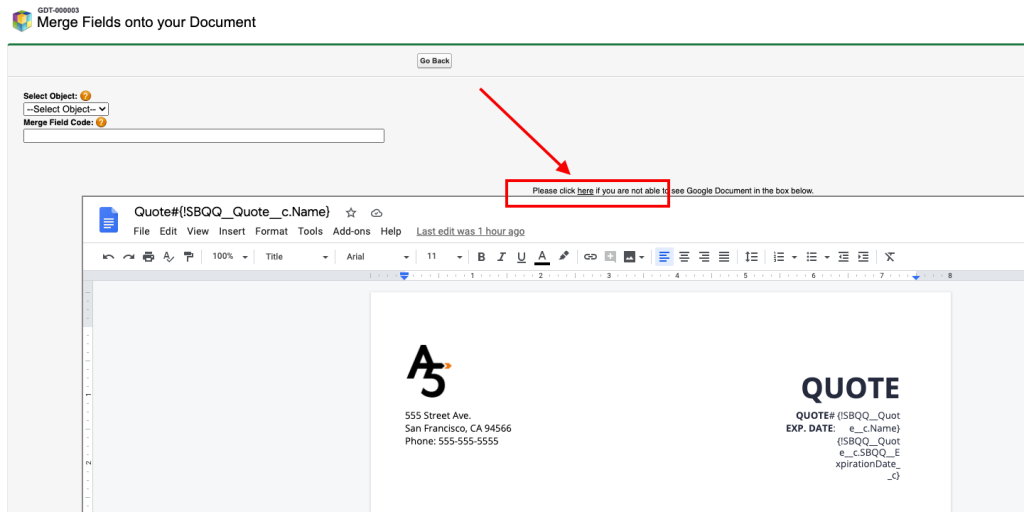
- Now that you have your own google doc template on the document action you can modify the template. From Document Action go to “Edit Template Document” button. You can now get your merge field codes from here and paste them into the google doc embed below.
- If you find it easier you can also open the Google Doc template in it’s own tab. You can copy and paste your logo into the google doc or insert an image to replace the sample logo.
- You can do the same as above for the Invoice Document Action/Template.
Customize Document Actions
This section will guide you through various features that you can configure on the Document Action, which controls what happens when you click the document generation button.
- Go to the Document Action tab and click to view All list. Click on either the Email Quote or Email Invoice Document action record you want to edit.
- On the Document Action record you can see all the settings for what you want to happen for your document action and you can edit the fields on the record.
- The default record we included in the unmanaged package for “Email Quote” does the following in the action:
- Generate PDF and attach to record.
- Save the generated Google Doc URL to “Quote Doc URL” field on Quote object.
- Prepare an email and redirect to the preview page.
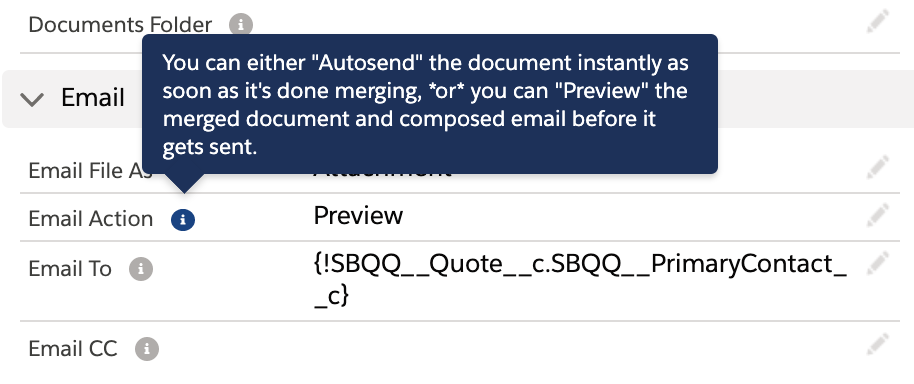
- Populate the Email with an email template selected, the Email To is the Primary Contact on the Quote, the PDF is attached.
- Update the Status to “Sent”. Please note that the status will update just before directing to the email preview page. So if you don’t end up sending the email it still will update to Sent. The document action has technically finished all its process by this step. In this process, it would assume you emailed it. If you were to utilize automatically sending the email without the preview then there is no concern here.
- Our example email template also includes links in the email to view the Google Doc of the Quote generated to allow the customer to make comments or redline the Quote.
- We also included a link in our email template that merges a formula field as url to download a PDF version of the document. We provided this as an example in case you want to use it. The field used is called “Document PDF Link”. With this option, you could potentially not attach a PDF to the email.
You can consider what you want to change about the action. Do you want to email it? Do you want to automatically email it without going to the preview page? Do you want to attach the pdf to the record in addition to sending an email or just send the email where the attachment is also existing there on the email history? Do you want to download the PDF instead to your computer? Do you want a PDF, Word, or just a Google Doc? Who do you want to send the email to, CC, or BCC?
You can hover over an “i” icon next to a field on the Document Action to understand what is the purpose of a field or which function it supplies.
Likely you will want to at least modify the email template used. The unmanaged package created an email template for you to use as-is or customize it. It is saved in Setup, Classic Email Templates, in the folder “Opero Documents”. The quote email template is called “Email Quote”, the email invoice template is called “Email Invoice”. You can customize the existing email template and the template id in the Document Action can remain the same.
If you have another email template or want to create a new one you may do so. Then copy the salesforce id of that email template from the url when looking at it and update the Email Template value on the Document Action.
Once you have made your changes to the Document Action and saved it, the button code at the bottom of the page layout will update to reflect the new settings.
- Copy the button code and then go to Setup, Object Manager, select Quote or Invoice object, then go to Buttons, and find the existing Email Quote or Email Invoice button and edit it.
- Now you can select all the button code in that button and paste the newly copied button code from the Document action to replace it. Then save it.
This process is similar to the initial button configuration, as described in the Opero Documents Basic Configuration article.
Now you can test out your updated button on the Quote or Invoice. You can also create new Document Actions and configure them for use on any object.
Use Groupings on Quote
If you use the grouping feature of CPQ then read below. We have created an example Quote template that allows formatting with Groups. View the google doc example template here.
- Go to File, Make a Copy to make a copy of that google document.
- Now copy the google doc ID in the url and you can update the Template Doc ID on the Document Action “Email Quote”.
A second option (more advanced):
- Use the second Document Action record called “Email Group Quote” with this sample template set.
- Follow the same steps as above in viewing this Document Action record and Edit the Template and view the google doc.
- You can create a copy of this google doc and then set this as your Template Document ID in your document action. Then modify it. Set the sharing settings so anyone with the link can view it.
- Now add the “Email Group Quote” button on the Quote page layout.
- If you look at the button code link you will see there is an IF statement in the url that looks to see if the current quote has groups or not and then selects the matching Document Action.
- If you want to continue to use this you will need to keep this part of the formula in place if you update the button code as the generated button code on the Document Action will not take this IF statement into account.
- However, keep in mind the current template supports groups or no groups using conditional merge sections. But you may want to separate the templates like this and then use this conditional IF statement in the button code.
- If you always have groups you can configure your final button to not have this if statement and not manage two templates and just use one document action.
- You should remove the Email Quote button if not being used or delete it and then rename this button to “Email Group Quote”. Since this “Email Group Quote” button has the logic to use either template/document action dynamically.
Note: The template uses some fields installed by the unmanaged package to determine if there are Groups on the Quote and how many then will conditionally merge each group and their line items.
We built this out to support a max of 10 groups, however, you could extend this further following the same logic in the configuration. Or if you know you will never have more than 3 groups for example you can remove the conditional merge sections after group 3 on the template.
You can see on the template we have a conditional merge section for each group. Then the related list filters the quote line items for that specific group. It also has a conditional section at the top if there are no groups existing on the quote. So it is dynamic within the template to support groups or not groups
Managing Terms in Document
You may input terms directly into your Quote template as just another part of the document. You may control which user can edit the quote template document as a way to control the template overall.
If you require to develop Terms with an approval process that is then approved to be merged into a quote document while still allowing other users to modify the quote template then follow these steps.
- Use Terms object installed by the Unmanaged Package to create any terms required. Configure an approval process on the Terms object if desired.
- The Body field on the Term record is the text that you would merge. Note that it is not rich text. If you want to add any formatting to the heading before terms text is merged put the heading into the template then you can add the merge field for the Body.
- Included in the unmanaged package is a lookup field called Terms that is a lookup to the Terms object. You can use or repurpose this field. You should add it to the Quote page layout.
- If there are multiple terms that need to be merged then create additional lookup fields.
- There is a process builder called “Quote Terms Default” that was included in the unmanaged package that you can adjust and activate to use. The process builder will set the Terms lookup field on the Quote to the Terms record. You must adjust the process builder to indicate which Terms record you want to set by default when a new Quote is being created.
- Update the criteria logic in the process builder as needed to set Term lookup fields you created to specific Term record by default based on any criteria.
- If you always include the same Terms into the document, then you could have no criteria and just configure to always set the Term record you previously created. Otherwise, you may have criteria based on any fields on the Quote or related record.
- You can configure this Process Builder to set multiple Term lookup fields.
- If the Terms are conditionally merged into the document, then configure formula fields of checkbox type with logic for each Terms section with the criteria if included or not if applicable to the business process.
- Criteria may just be that the Term lookup field has a value or anything else. You will use this field to create Conditional Merge Sections on your template.
- Included in the unmanaged package is a field called “Include Default Terms” that is a formula/checkbox field. It looks if there is a value in the Terms lookup field and if so is checked. You can use this field as a conditional merge section which is shown in the example Quote template.
- Configure template of Quote to merge the Body field from related Term lookup fields on Quote and configure conditional merge sections if applicable.
Auto Emailing Invoices with Invoice Scheduler
If you are using the Invoice Scheduler to generate invoices in batches on a schedule or on-demand you can use Opero Documents to automatically email invoices when the Invoices are generated.
By default, Opero Documents is enabled in the org to process 1 document at a time which can take 5-20 seconds per document. If you need increased processing speed you may request support to enable a higher parallel processing limit up to 200 at a time which will generate roughly 25,000 per hour. In the unmanaged package, we have installed a Process Builder called “Email Invoice Posted”. By default, this PB is not active. You can go to Setup, Process Builder, and click on this PB to view it, update it before you can activate it to use. Find detailed steps below on how to activate the feature.
Steps to activate Auto Emailing Invoices with Invoice Scheduler:
Configure Invoice Scheduler
- You would configure the Invoice Scheduler to create Invoices with the Status Posted. You can follow this document or work with your consultant to have this step configured.
- In the unmanaged package we have added a custom field on the Invoice object called “Send Status”. You can use this field to track the sending of the Invoice.
- Add this field to your Invoice page layout.
Set up Org-Wide Email Address and get the Org-Wide Address ID
- Go to Setup, Email, Organization-Wide Addresses.
- Click Add and in the form specify the display name and the email address in the corresponding fields. Select the profiles as necessary or Allow All. Click Save.
- You will see the new address in the list, click the Edit link.
- In the browser address line, copy the value between %2F and %2Fe. This is Org-Wide Address ID.
- Check the Inbox of the indicated email, you’ll receive an activation link. Make sure to activate your org-wide email.
Update “Email Invoice Autosend” Document Action
- Go to Document Actions and open “Email Invoice Autosend”.
- Scroll down to the Email section and in paste the Org-Wide Address ID value to the Email From Org Wide Address field. Save the Document Action.
- Keep this tab open and continue to next steps.
Update “Email Invoice Posted” Process Builder
- While “Email Invoice Autosend” Document Actions is open, in the browser URL copy the value between rsdoc__Document_Action__c/ and /view.
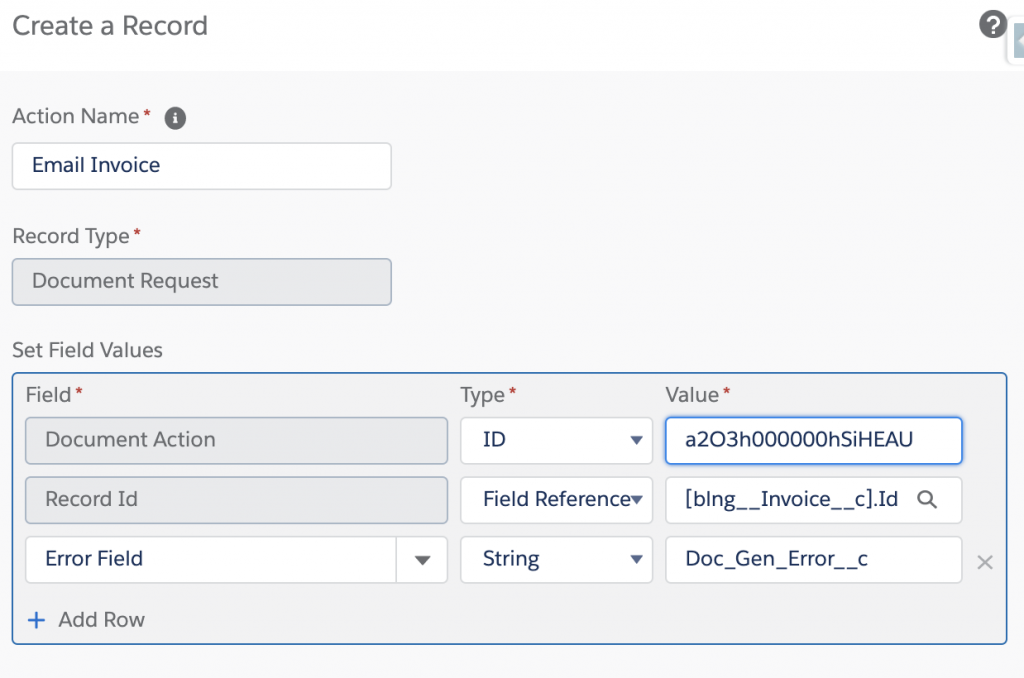
- Next open Setup, go to Process Builder, open “Email Invoice Posted” process. Then click on the immediate action called “Email Invoice”.
- Under Set Field Values will see Document Action value. Substitute it with the copied Document Action ID and click the Save button.

- Now you can Activate this Process Builder, the feature is activated
Note: The Process Builder is configured to execute the Document Action when an Invoice record is created/modified that is Posted status but Send Status is blank and Bill To Contact has a value. These criteria will be met when the Invoice Scheduler creates the Invoice.
The Bill To Contact is required in order to execute the Document Action. We have included an action in the PB that if the Bill To Contact is not populated it will copy the Bill To Contact from the related Account. After that action is completed it will then meet the criteria to execute the document action. If you have another process already that populates the Bill To Contact then you can delete this action in the PB or adjust the criteria to fit your process.
Test Emailing Invoices with Invoice Scheduler
- After Process Builder is Activated, to test this feature you can create an Invoice in Draft Status. When ready change the Status to Posted. Ensure you have a Bill To Contact. Or you can check the Bill Now checkbox on an Order to auto-generate the Invoice for the order then change to Posted status.
- Then wait for it to execute and look if the Send Status updated on the Invoice and seeing the email history, attachment, Invoice Doc URL populated, and if you received the email if sent to your own email.
- Once you confirm the manual test worked fine you can test with the invoice scheduler by setting the Invoice Scheduler to run once at a time 1 minute from now.
- You will need to have some Orders that will need to have an invoice processed.
- If you have any subscription products on an Order you can generate multiple invoices on that Order. To do so, you will need to import/update the Order Product.Override Next Billing Date to today’s date using data loader or manually. This will allow you to test multiple times on the same Order records to generate invoices in a batch.
- Also, ensure your Order.Invoice Batch is set to Batch 1 or whichever batch you select for the Invoice Scheduler.
- You can view your batch processing by viewing the Document Requests tab. You can sort the All list view by created date. You can also create a report on the Document Requests object with the date range of created date and see how records get updated.
- Note that the Document Request.Status will update to Completed or Error if there is an error and the Last Modified Date will update to when that status updates happen so you can see when the document request finished processing.
- You can also look at Invoice records and the Send Status field to see the status of the invoices being sent. If Send Status is not updated then you should be looking at the Doc Gen Error field to see if there was an error.
Emailing Invoices from List View in Batch
Optionally you could want to review a list view of Invoices previously generated then want to mass generate and email them from the list view. You need modify this PB as described below to fit your process or other customizations.
Activate Emailing Invoices from List View
- Open Document Actions and find “Email Invoice Autosend” action and open it.
- Look into the browser URL copy the value between rsdoc__Document_Action__c/ and /view.

- Next open Setup, go to Process Builder, open “Email Invoice” process. Then click on the immediate action called “Email Invoice”.
- Under Set Field Values will see Document Action value. Substitute it with the copied Document Action ID and click the Save button.
- Now you can Activate this Process Builder, the feature is activated.
Test Emailing Invoices from a List View
- To test the feature open the list view “Invoices to Send” on the Invoices tab. There is the field “Send Status”.
- Check the boxes next to all the Invoices you want to send or use the check all box at the top of the list view. You may want to scroll down to load more records if in lightning.
- Next double click into the Send Status field on one of the records and change it to “Ready to Send” and select to apply to all records checked. Then click Save at the bottom of the list view. Saving this value for these records will then execute the PB you previously activated and email the invoice.
- You may now refresh the list view and those records you just saved will be removed from the list view since their Send Status now has a value
Note: Once the document action has completed processing the Invoice it will update the Send Status to “Sent”. Then you can view all Invoices Sent on the list view Invoices Sent. This list view shows Invoices that Send Status = Sent but Paid = false. So once an invoice has been paid it will be removed from this list view.
You may also check the Invoices Ready to Sent to see the Invoices that you updated to Ready to Send but they have not been processed yet. Once their Send Status is updated to Sent it will remove from this list view.
However, if there is an error in the document action for that record it will not update the Send Status and you will see an error listed in the Doc Gen Error field. You can also view Document Request records to track the status.